Final Observations
For our last day of lab, after checking out of our dorms and dragging our luggage across campus, we took another look at our incubated inoculations from days 3 and 4 so we could determine the identity of our unknown bacteria (unknown F). The casein and triglyceride tests that we re-incubated yesterday still showed negative results. We can conclude that our bacteria does not use casein or triglycerides as energy sources.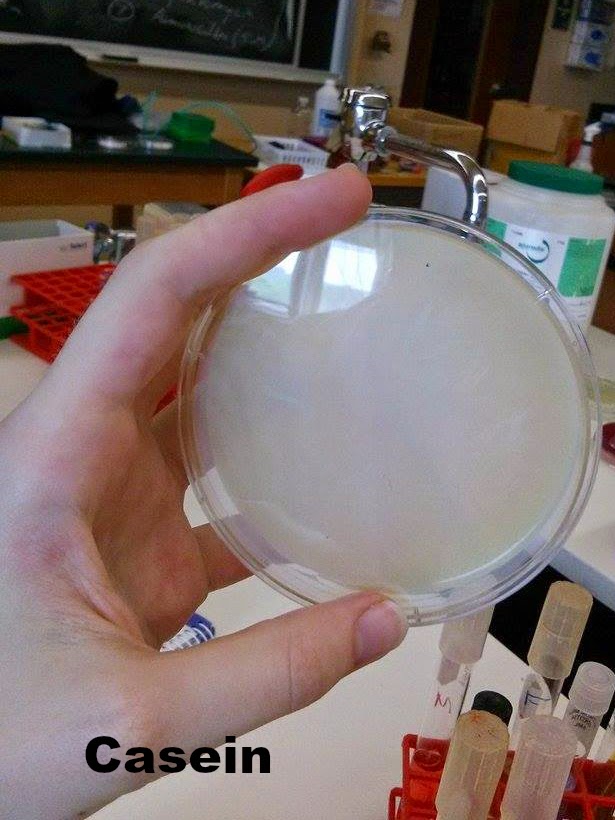

Our re-incubated litmus milk test also looked negative at first glance. A true negative result would indicate that our bacteria doesn't use glucose, sucrose, or lactose. This didn't agree with the results of our earlier individual carbohydrate tests, which showed that our bacteria uses all three of these sugars. Since the purple litmus milk didn't turn white, litmus has not been reduced (it didn't accept hydrogen). The lack of a deep purple color at the top of the liquid indicates that the bacteria does not use casein, which is consistent with our other casein test. But the milk should have turned pink since we know that our bacteria converts lactose to lactic acid (from the positive lactose test). We compared our inoculated tube with a control and observed a slight difference in color, but we concluded that since the litmus milk contains such a small amount of the three sugars, we shouldn't be dissuaded by the lack of pink. It is still safe to say that our bacteria uses glucose, lactose, and sucrose for energy.

Our TSI (triple sugar iron) test came back positive today. It showed an acid slant in addition to an acid butt, showing that our bacteria did indeed use lactose and fructose. We knew our sample was acidic because the solid turned more yellow than it had been. Since the butt (the part below the slant) did not turn black, we can conclude that there was no hydrogen sulfide gas produced.

We re-examined our gelatin test and ended up with the same negative result we found yesterday. Our gelatin tube was a liquid when it first came out of the incubator, but became solid when we placed it in the refrigerator. We can conclude that our bacteria does not produce gelatinase.
Our citrate test was still negative as well - there was no color change in the tube, so we can conclude that citrate is not our bacteria's sole carbon source.
Selective and Differential Results
After double-checking our Day 3 inoculations, we moved on to those from Day 4. We started with the test for strep throat since our classmates were very curious about what it would say of their health. The blood agar plate we inoculated was equipped to provide information about the presence of strep bacteria in the throat as well as what group of bacteria they were. Group A (S. pyogenes) causes strep throat, but Group B (S. agalactiae) does not. We first looked for beta hemolysis of the blood agar to determine if either A or B was present, and then looked at the reaction to the bacitracin disc to differentiate between A and B. Group A is sensitive to bacitracin, while Group B is not.


Although both cultures showed sensitivity to bacitracin, they both resulted in alpha hemolysis rather than beta. We concluded from this that the bacteria present were not S. pyogenes (or S. agalactiae), so both 'patients' were negative for strep throat.
This was a particularly exciting experiment because it is definitely something we will do in a clinical setting. We learned the procedure for taking throat swabs and all of the science behind how the lab tests work, so now we are that much more prepared for nursing careers or diagnosing friends on campus.
The other groups who tested for MRSA (methicillin-resistant S. aureus) via nasal swabs taken yesterday also found negative results, much to everyone's relief. This is also a very important test for us to understand. MRSA colonizes in the noses of carriers, so testing the nasal swab checks for the presence of MRSA in a patient. If this test comes back positive, the patient needs to be rid of the colonization before undergoing anything like surgery, as that would allow it to spread to the rest of the body.
Next we returned to the selective and differential plates that we had inoculated with our unknown bacteria. Our blood agar plate showed gamma hemolysis (no lysis), a clue that we used later in the day to help determine our bacteria's identity.

Our mannitol salt test checked to see if our bacteria was S. aureus. If this was the case, the plate would have turned yellow after incubation as a result of the acid produced from the use of mannitol. Our sample had a slight yellow tinge, but not enough to conclude that mannitol was being used, especially since our mannitol sugar tube was negative. Therefore our bacteria is something other than S. aureus, and we have more results to view to find out what it really is.

Our MacConkey agar plate also showed a negative result. Only Gram-negative bacteria will grow on a MacConkey agar plate, so the lack of growth is an indication that our bacteria is Gram-positive. This is consistent with our earlier conclusions from the Gram stain. The MacConkey agar plate is important in clinical settings because it is used as a defining diagnosis for ETEC (E. coli) infections.

Next, we checked our inoculated phenylethyl alcohol agar plate. This one is selective for Gram-positive bacteria (Gram-negative bacteria won't grow on the plate). Our bacteria did grow, so this is further confirms our conclusion that it is Gram-positive.

We also inoculated one more plate - an EMB (eosin methylene blue) plate. We used a sterile plastic tip to transfer our bacteria from our working stock to the EMB plate, and then placed it in the incubator for Dr. P to check later. This plate contains multiple dyes that act as pH indicators, and is frequently used to isolate fecal coliforms in samples. Ours came back negative.
Antibiotic Susceptibility
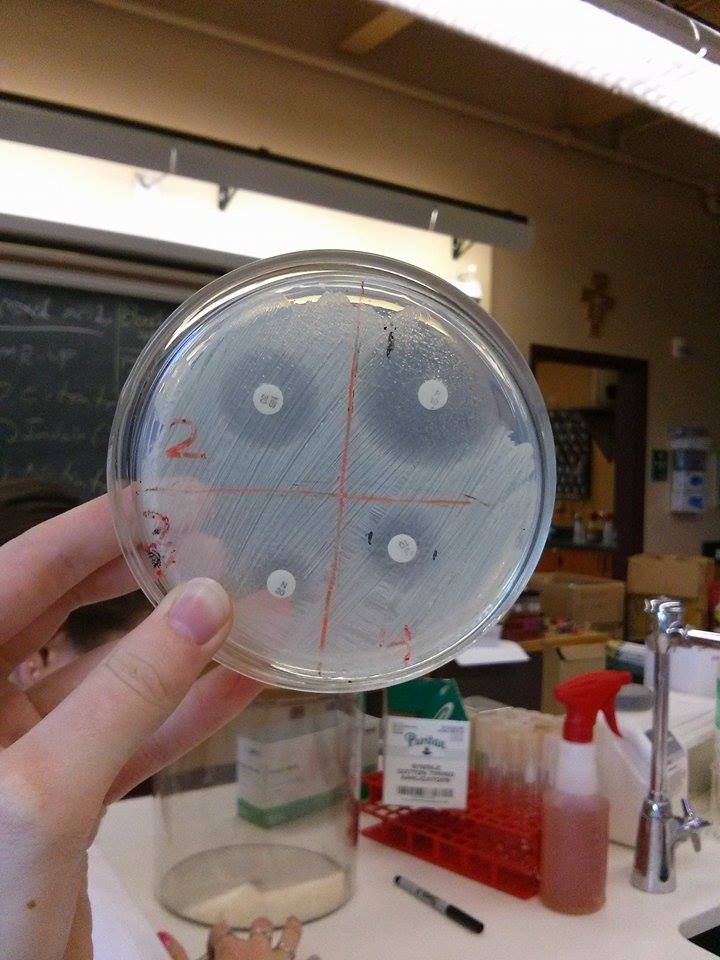
After finishing with our selective and differential plates, we moved on to checking the results of the various antibiotic discs that we placed in our inoculated agar plates yesterday. To check our bacteria's susceptibility to the drugs, we measured the diameter of the sensitive circles - the areas around the antibiotic discs where there was no bacterial growth. The diameters of the sensitive circles for each drug are as follows:
- Penicillin - 25 mm
- Novobicin - 20 mm
- Neomycin - 10 mm
- Streptomycin - 15 mm
- Tetracycline - 17 mm
- Erythromycin - 0 mm
- Amoxicillin - 25 mm
- Oregano - 13 mm

We then compared our measurements with a data table that showed the measurement ranges for resistance, sensitivity, and an intermediate for each drug so we could draw empiric conclusions about our bacteria's reaction to all the drugs. These conclusions, expressed as "Drug - conclusion (range from data table)," are:
- Penicillin - resistant (<28 mm)
- Novobicin - intermediate (18-21 mm)
- Neomycin - resistant (<12 mm)
- Streptomycin - sensitive (>15 mm)
- Tetracycline - intermediate (15-18 mm)
- Erythromycin - resistant (<13 mm)
- Amoxicillin - sensitive (>20 mm)
- Oregano - somewhat effective*
*Since the oregano oil used is not a clinical drug, we evaluated its effectiveness by comparing the size of its sensitive circle to the other drugs we tested. It was less effective than Amoxicillin, which was the most effective drug against our bacteria, but it still inhibited bacterial growth to a certain extent.

Based on these data, we can conclude that Amoxicillin is the most effective drug (of those tested) against our bacteria, but Streptomycin would also work. Our bacteria is resistant to Penicillin, Neomycin, and Erythromycin, so these would not work to treat a bacterial infection caused by our bacteria (unknown F).
Antibiotic sensitivity and resistance is an important concept for nursing. It is crucial to recognize that not all antibiotics work against all bacteria, and knowing the difference between drugs that will help clear an infection and drugs that won't (or knowing how to find this information) can be a matter of life and death in some cases.
ELISA Antibody Test
After getting through the last of the Petri dishes, we learned about the antibody test used to detect HIV. We listened to a short lecture on the basics of how the test works, and then tried it for ourselves.
We were given different wells that contained different substances for different parts of the experiment. Some of these substances were different patient samples, the HIV antigens, and unknown liquids for testing.

Then we received a microplate strip, which consisted of 12 connected wells. We labeled 3 wells with a "+" and 3 with a "-" to indicate the control samples that were positive and negative for the HIV antigen. The last 2 sets of 3 wells were labeled with the initials of the 'patients' that the unknown samples belonged to. Our goal was to test those for the antigen to determine whether they were HIV-positive or -negative. These wells had already been treated with the unbound antigen serum by Dr. P and washed out with a buffer.

Next we transferred 50 microliters of the positive control sample (in the violet tube) into the wells with "+" on them, and 50 microliters of the negative control (from the blue tube) into the wells labeled with "-". We then transferred 50 microliters of each of the patients' samples into the wells with their initials. We waited 5 minutes to allow the serum samples to bind to the antigen on the walls of the wells and then rinsed them out with buffer like we watched Dr. P do earlier. After the wells had dried properly, we added 50 microliters of the secondary antibody (SA) from the orange tube into all 12 of the wells. After waiting another 5 minutes to allow for bonding, we washed and dried as previously stated - twice - to ensure that no secondary antibody was left in the wells.
The last step of this experiment was adding 50 microliters of enzyme substrate (SUB) from the brown tube to all 12 of the wells. This substrate acts as the indicator for the test results because it binds with the secondary antibody present in HIV-positive samples, turning the colorless solution blue. After 5 minutes we observed that the wells with the positive control (labeled "+") turned blue, along with the patient samples labeled "FN". We concluded that they were positive for HIV. The wells of the negative control (labeled "-") and the samples from patient "AF" remained clear, indicating that no HIV antigens were present and that they were negative for HIV.

Understanding the basics of this HIV diagnosis is going to be useful in our nursing profession because we will need to know how to recognize and treat patients infected with this virus. Because these immunocompromised patients are so extraordinarily susceptible to disease, it is important to treat them with extra precautions and often different drugs, doing everything in our power to prevent them from contracting a disease.
Identifying the Unknown Bacteria
It was the end of our last day of lab, and finally time to solve the mystery of our unknown bacteria (unknown F). To do this, we began by compiling the results from all of the tests we performed this week. The summary is as follows:
- Morphological Characteristics
- Cell shape: round (cocci)
- Arrangement: mostly clusters
- Size: small
- Spores: no
- Gram stain: positive
- Motility: non-motile
- Capsules: yes
- Special stains: not acid-fast
- Cultural Characteristics
- Colonies
- Nutrient Agar: convex, raised, white/rose
- Blood Agar: gamma lysis
- Agar Slant: raised, white
- Nutrient Broth: turbid
- Gelatin Stab: negative
- Oxygen Requirements: facultative
- Optimum Temperature: 37 degrees Celsius
- Physiological Characteristics
- Fermentation
- Glucose: positive
- Lactose: positive
- Sucrose: positive
- Mannitol: negative
- Hydrolysis
- Gelatin Liquefaction: negative
- Starch: negative
- Casein: negative
- Fat: negative
- Others
- Indole: negative
- Methyl Red: negative
- Voges-Proskauer: negative
- Citrate Utilization: negative
- Nitrate Reduction: negative
- Hydrogen Sulfide Production: negative
- Urease: positive
- Catalase: positive
- Oxidase: negative
- Litmus Milk (reaction: time)
- Acid: N/A
- Alkaline: N/A
- Coagulation: N/A
- Reduction: N/A
- Peptonization: N/A
- No Change: 48 hours
With all this information handy, we were able to use various flowcharts to determine and double-check our bacteria's identity.

We used the above flowchart for our initial identification. Since we started off with the knowledge that our bacteria is Gram-positive and round, the next question was whether it is positive or negative for catalase. We determined that it is catalase-positive, so the chart told us that we were dealing with either Micrococcus spp. or Staphylococcus spp.. The next differentiation was the fermentation of mannitol, which our bacteria was negative for. This meant we had either S. saprophyticus, S. epidermidis, M. luteus, or M. varians. Telling the chart that the bacteria is pigment-negative and positive for fructose fermentation led to a conclusion: our unknown bacteria is Staphylococcus epidermidis.

To double-check, we used a second flowchart. This one also started with Gram-positive cocci, which includes Micrococcus, Staphylococcus, Streptococcus, and Enterococcus spp, and then asked whether catalase is produced. Our bacteria is positive for catalase, which narrows it down to Micrococcus or Staphylococcus spp. Next, we knew that our bacteria was negative for mannitol fermentation, so we could rule Staphylococcus aureus out. The chart's next question was whether our bacteria's colonies had a yellow pigment. Since ours did not, the possibilities were narrowed down to the Staphylococcus spp. After this, the determining factor was the bacteria's sensitivity to novobicin. Our measurements showed that our bacteria is sensitive to novobicin, which confirms our initial finding that unknown F is Staphylococcus epidermidis.
Just to be sure and to broaden our understanding, we looked up S. epidermidis in Bergey's Manual to compare the characteristics listed with what we found in our experiments. The information was consistent with our results, so we concluded that our identification was correct. Being able to use clues like this to determine the identity of a microorganism or the cause of a disease is an important healthcare skill, so this was good practice for our deductive reasoning skills even if we won't be going through these exact procedures as nurses.
More specifically for our bacteria, it is also clinically important to differentiate between S. epidermidis and S. aureus. The former is generally harmless and part of the indigenous microflora, but the latter can cause harmful infections and skin lesions. Knowing the difference between the two is crucial for treatment.
Discovering our bacteria's identity drew our week to a close. Unfortunately, we were unable to celebrate with a yogurt feast as the yogurt wasn't done forming in the incubator, which hadn't been at quite the right temperature. We got over that disappointment pretty quickly when Dr. P invited us outside for a game of frisbee in the sun until it was time to leave. All that's left is to go home and study until all of our experiments make sense.


